Ubuntu 9.04 Jaunty distribution release date draws near. Pulseaudio – the future is coming up as well. I admit that it works better compare to Intrepid, however, I still want to stick to the no-frills ALSA for my Intel on board card. If Pulseaudio works for you, by all means stick to it. I merely give you another option to choose. By the way, I manage to get my mic working 🙂 This guide will help you to kind of disable pulseaudio from starting / avoid pulseaudio to hog the sound hardware. It also solves the problem of every boot, the master channel is turned all the way down and muted.
The Environments: Firstly, I upgrade my Intrepid to Jaunty RC 32bits PC through ‘update-manager -d’. I have only one laptop so I can’t test the vanilla Jaunty RC version. Though, I will try to match the configuration as best as I can. Secondly, I have a built-in mic. Thirdly, the soundcard is an onboard Intel STAC9200 and I don’t have 2nd soundcard. For the uninitiate, the $ in front just denote your shell, after that is the command.
Required Packages: alsa-oss; libasound2; libasound-plugins; sysv-rc-conf (optional)
$ sudo apt-get install alsa-oss libasound2 libasound2-plugins sysv-rc-conf
The Procedure:
Step 1:
When I upgrade to Jaunty, it doesn’t install any new ’70pulseaudio’ file in Xsession. If there is no such file, safely ignore this step. If it is present, move it to somewhere safe. The command below sends it to your home root folder.
$ sudo mv /etc/X11/Xsession.d/70pulseaudio ~/
Step 2:
Disable Pulseaudio service from run level. Watch out for the dot at the end. Else you can use sysv-rc-conf GUI.
$ sudo update-rc.d pulseaudio stop 50 2 3 4 5 .
Unset Pulseaudio from system and set my card from ‘asoundconf list’
$ asoundconf unset-pulseaudio
$ asoundconf set-default-card Intel
Make sure your libao.conf is using alsa. Use gedit if you like. For the uninitiate, to save in nano, press Ctrl + x.
$ sudo nano /etc/libao.conf
default_driver=alsa
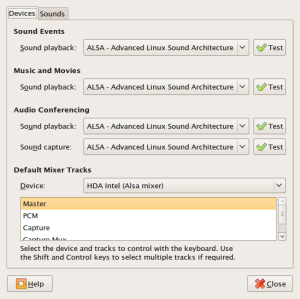
Navigate from the menu: System – Preferences – Sound, make sure yours looks like the one in the screenshots below:

So far so good. Cos those steps are similar to my previous guide. Now come to the more tricky part.
Prevent Pulseaudio from daemonize. Open ‘/etc/pulse/client.conf’ with your editor again. Look for this line ‘autospawn = yes’ then change it to ‘autospawn = no’.
This folliwng step is thanks to one of my reading of Sonal Santan on the mailing list last time, but now in Jaunty then it can shine. If the just above step doesn’t work properly. Open ‘/etc/pulse/default.pa’ in an editor. Look for lines similar to the following two commented out lines:
#load-module module-alsa-sink
#load-module module-alsa-source device=hw:1,0
Add the following two lines just after these two lines:
load-module module-alsa-sink device=dmix
load-module module-alsa-source device=dsnoop
The above change will force PA not to take exclusive control of sound hardware.
This step is similar to my old guide. Open ‘/usr/share/alsa/alsa.conf’ in an editor. Comment out the line which says ‘/usr/share/alsa/pulse.conf‘ by inserting a # in the beginning. After the change, the @hooks section would look something like the following.
@hooks [
    {
        func load
        files [
#           "/usr/share/alsa/pulse.conf"
            "/usr/share/alsa/bluetooth.conf"
            "/etc/asound.conf"
            "~/.asoundrc"
        ]
        errors false
    }
]
The above procedure will make sure ALSA is use system-wise. 🙂
OPTIONAL (But recommended anyway): Go to this link, https://help.ubuntu.com/community/HdaIntelSoundHowto look at this section Manually Specify Module Parameters and do yourself a favour 🙂
Step 3:
Application specific issue is discuss here. Mplayer only at the moment.
MPlayer: 10 second wait before audio start playing.
—> Edit ‘/etc/mplayer/mplayer.conf‘, change the order to the order below (original pulse,alsa)
# Specify default audio driver (see -ao help for a list).
ao=alsa
Step 4:
THE MIC WORKS 🙂 ! This step might need the optional step Manually Specify Module Parameters above.
I will give you a short tutorial on `alsamixer` which is required to get the elusive mic to work. Open alsamixer by type ‘alsamixer’ in the terminal. In alsamixer, using Tab to change View property. To MUTE/UNMUTE press m. To move the slider, use up and down key. To move to another property of same view, use right and left button. And the spacebar…
Now guys, you see the box right below the slider? [ 00 ] == unmuted, [MM] == muted. Check before you keep whining that there is no damn sound.
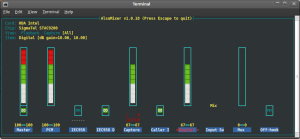
For the Mic to work, make sure (look at the screenshot, that’s how your should looks like)
Capture and Digital properties are not muted / not zero db. 67 is a good value. Capture should look like in my screenshot . If your capture looks like, —– then press space bar once to change it to L R Captur.
Mux should be at zero.
Select your Input Source to Mic. Fire up your gnome-sound-recorder, choose Capture the voila. The capturing quality is better than M$ Windows with noise cancellation. Bleh 🙂
Step 5:
Check that you didn’t miss any step. Reboot (don’t be lazy) and make sure the damn sound is not muted =.=” .
Cheers and don’t disturb me for at least 3 weeks 🙂 Let me be at peace with my exams.
TROUBLESHOOTING
If you get the message as below
“audiotestsrc wave=sine freq=512 ! audioconvert ! audioresample ! gconfaudiosink: Could not open audio device for playback.”
You need todo the following to resolve it. Backup .asoundrc first =)
‘sudo /etc/init.d/alsa-utils restart’
OR/AND
‘rm ~/.asoundrc’
Btw, I set up twitter @ http://twitter.com/idyllic_tux to further disseminate any tips if I have in the future.
