Feeds:
Posts
Comments

Archive for the ‘Networking’ Category

Howdy,

My trusted Toshiba Tecra M5 motherboard gave up on me last week. I ended up spending all my savings on a new HP ProBook 4310s from my university. But configure this baby is a pain when it comes to Linux.

I loaded Linux Mint 7 Gloria (GNOME) then switch to Kubuntu Jaunty with 4.3.1 from backport. After 1 week of tingling with the configuration, installation and uninstallation, finally I had a usable system. I will not elaborate too much at the moment, since I will have mid-term soon. Also I am going to nuke my current system when Karmic come out.

SOUND:

Add either of the line below in ‘ /etc/modprobe.d/alsa-base.conf ‘
options snd-hda-intel model=mobile
OR
options snd-hda-intel model=laptop

In KDE4 there isn’t much problem, but in GNOME, you might have to reload the alsa module from time to time, very annoying.
$ sudo alsa force-reload

Wireless:

iwl5100 needs backport module

$ sudo apt-get install linux-backports-modules-jaunty

ATI Mobility Radeon HD 4330:

This is the most painful thing when it comes to compositing.

You will probably need a no backfill patch. Some minors and tolerable corruption but no more slowness when maximized and resized.
https://launchpad.net/~ubuntu-x-swat/+archive/xserver-no-backfill

Stock fglrx-installer is the worst (install X crash when fullscreen in mplayer – both stock and from rvm ppa) . Fglrx 8.620 (CC 9.6) from x-updates is okay for generic use but XV in mplayer performance is terrible and also has scaling problems. Basically, your viewing experience in mplayer will be a horrible one. Best for me is CC 9.9 from AMD: good compositing, Xv correct scaling with default settings. http://www2.ati.com/drivers/linux/ati-driver-installer-9-9-x86.x86_64.run

Instruction for 9.9 can be found below. I used the 2nd link mainly for complete removal of the old conf.
http://wiki.cchtml.com/index.php/Ubuntu_Jaunty_Installation_Guide#Installing_the_drivers_manually
http://k3mist.com/linux/ati-catalyst-9-9-fglrx-8-650-installation/

Cheers,

Any problem please feel free to drop me a comment =)

UPDATE 1:
To install webcam viewer:
sudo apt-get install luvcview

UPDATE 2:
Upgrade to alsa 1.0.21 to have no more cracking noise with max PCM.
http://ubuntuforums.org/showthread.php?p=6589810
Read Full Post »

Here is a script to find the maximum MTU (the value before the packet is fragmented). I was not particularly satisfied with dlsreports guide. The command given for us linux might not work most of the time (doesn’t prohibit fragmentation at time) as well as it is not an automatic operation but relies on trial and error.

=================================================================================

#!/bin/bash

PKT_SIZE=1472
HOSTNAME="www.dslreports.com"

count=`ping -M do -c 1 -s $PKT_SIZE $HOSTNAME | grep -c "Frag needed"`

while [ $count -eq 1 ]; do
 ((PKT_SIZE--))
 count=$((`ping -M do -c 1 -s $PKT_SIZE $HOSTNAME | grep -c "Frag needed"`))
done

printf "Your Maximum MTU is [ $((PKT_SIZE + 28)) ] \n"

=============================================================================================

This script will neatly print out the maximum MTU at the end of the operation after finding the optimal value of the packet size.

Explaination:

-M do : Select Path MTU Discovery strategy do (pro‐hibit  fragmentation,  even local one)

-c : to stop ping when you are done sending information.

Read Full Post »

-= My first offering to XFCE goddess =-

pyNeighborhood enables you to access your local network, mounting and unmounting shared folders, almost (yes, almost) 100% GUI – point and click. It works with both Windows and Linux shares,though I will cover the more problematic Windows share here. There are few guides floating around regarding pyNeighborhood but they falls short in tackle certain part as well as pose potential hazardous root access and alteration through file manager.

~* INSTALLATION *~

$ sudo apt-get install pyNeighborhood

~* CONFIGURATION *~

1. Set up the directory to be mounted

– If you prefer less troublesome procedure then just create one folder in your ‘/home/[username]’

– I prefer not to cluster my home, so I will set up the mount point in “/mnt/lan”

$ sudo mkdir /mnt/lan
$ sudo chown tux:tux /mnt/lan

You need to change ‘tux:tux’ to your username (owner) and group. Say your username is ‘foo’ then the syntax will be ‘foo:foo’.

2. pyNeighborhood can be accessed through “Applications” -> “Network” -> “pyNeighborhood”

3. Now, select “Edit” -> “Preferences” in pyNeighborhood.

– ‘General’ tab:  ‘Mount folder’ will be the path to the folder we set up in step 1.

– ‘Network’ tab: Tick ‘Always use msbrowse’ if unchecked as well as ‘Try to retreive IP address when adding a machine from the group browser’.

– ‘SMB’ and’CIFS’ tab: append this chunk in front of each command. Say my username is ‘tux’ again, for example SMB tab mount command will now be:

‘sudo -u tux smbmount’

Repeat the same for the rest of the mount and unmount command but replace your username instead of tux.

This step is IMPORTANT because it let you mount without entering root password and your filemanager will not having root access thus avoid the potential hazardous alternation. Everything will be inside your userspace only. The -u (user) option causes sudo to run the specified command as a user other than root.

– ‘File Managers’ tab, remove the xterm one and a new entry: ‘thunar’ (or whatever filemanager you are using).

~* USING pyNeighborhood *~

From the left panel, you will see an icon with a name of ‘Groups’. Select it then Right click and select ‘Scan using msbrowse’

Your local workgroup will appear in the left panel under ‘Groups’, so right click on it and click ‘scan’ to show the machines under that workgroup. [Error might occur here, go to troubleshooting part later in the guide]

Choose a machine to browse, right click on it, and click ‘Add’. Alternatively, you can also double click. Try to retrieve the machine’s IP address if it is not already entered, and then click ‘Ok’.

The machine will appear in the right hand pane. Right click on the machine and click ‘scan’ to show the machine’s shared folders.

To mount a share, right click on it and click ‘mount -> mount as SMB’ (note: if SMB does not work the share will automatically be mounted through CIFS). Alternatively, you can also double click. You will see the ‘Mountpoint’ beside change to the path of your mount folder.

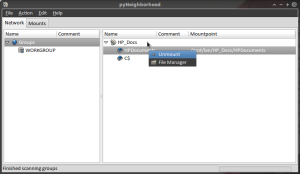
Right click the share, ‘unmount’ to unmount or ‘File Manager’ to access the file.

Have fun! 🙂

~* Troubleshooting *~

Thing will get a bit frustrating when you see this error on the status bar when you try to scan for machine under workgroup: ‘Failed to scan workgroup WORKGROUP’. Here we have to use commandline to get detail for the machine on the network then add to pyNeighborhood.

Open your terminal, type in the following command, note the workgroup and machine.

$ smbtree -S
WORKGROUP
\\HP040

So there is a machine HP040 in workgroup WORKGROUP. Now we will have to look for the IP of the machine we want using the following command. Just replace HP040 with whatever the smbtree spit out or the machine you want to connect to.

$ nmblookup -I \HP040
querying HP040 on 192.168.1.255
192.168.1.64 HP040<00>

The IP of HP040 is 192.168.1.64, so note that down.

Go back to our pyNeighborhood, ‘Edit’ – ‘Add Machine’

‘Network Name’ : Name of the workgroup spit out by smbtree

‘IP address’ : the ip above

‘Display in a list as’ : whatever you fancy of.

That’s it. We’re done. You can mount and view the machine from the right panel. 🙂

A picture speaks a thousand words:

pyNeighborhood

Read Full Post »