Feeds:
Posts
Comments

After upgrading to Natty 11.04, my gvim open dialog became more flaky. In before “:tabnew” and “:split” bashing, I am a noob so pardon my familiarity with Open dialog.

The Problem: Whenever I open gvim from shell and initiate the Open file dialog then try to open a directory, it doesn’t open the directory and the busy cursor is display. And itย  just stuck there like forever. Also, oxygen-appmenu caused Gvim to be unresponsive whenever you click on the menu.

The Workaround: Run gvim in foreground, so it will not fork and detach from the shell it was started in. ‘gvim -f <filename>’ or ‘gvim –nofork <filename>’

Personally I modified my .bashrc to create a new alias for gvim as follow: alias gvim=’gvim -f’

Cheers,

2010 in review

The stats helper monkeys at WordPress.com mulled over how this blog did in 2010, and here’s a high level summary of its overall blog health:

Healthy blog!

The Blog-Health-o-Meter™ reads Wow.

Crunchy numbers

Featured image

The Louvre Museum has 8.5 million visitors per year. This blog was viewed about 160,000 times in 2010. If it were an exhibit at The Louvre Museum, it would take 7 days for that many people to see it.

In 2010, there were 3 new posts, growing the total archive of this blog to 14 posts.

The busiest day of the year was May 2nd with 2 views. The most popular post that day was [Lucid][Ubuntu 10.04] High resolution Plymouth & Virtual Terminal for ATI/NVIDIA cards with proprietary/restricted driver.

Where did they come from?

The top referring sites in 2010 were ubuntuforums.org, code.google.com, wiki.ubuntuusers.de, ubuntu-ky.ubuntuforums.org, and habrahabr.ru.

Some visitors came searching, mostly for plymouth resolution, ubuntu disable pulseaudio, pyneighborhood, ubuntu 10.04 framebuffer, and ubuntu plymouth resolution.

Attractions in 2010

These are the posts and pages that got the most views in 2010.

1

[Lucid][Ubuntu 10.04] High resolution Plymouth & Virtual Terminal for ATI/NVIDIA cards with proprietary/restricted driver April 2010
227 comments and 4 Likes on WordPress.com

2

Ubuntu 9.04 Jaunty – Keeping the beast Pulseaudio at bay April 2009
165 comments

3

ALSA instead of Pulseaudio for Ubuntu 8.10 Intrepid – a Non-Destructive way. October 2008
121 comments

4

Network Browsing with pyNeighborhood in Xubuntu Jaunty June 2009
13 comments

5

HP ProBook 4310s – Ubuntu Jaunty September 2009
8 comments

[Rant]
Deja vu. When Ubuntu first introduced PulseAudio, it was one hell of a plight for the end-user. And now it is Plymouth turn to make life an uphill struggle for user with recent ATI or NVIDIA card and proprietary drivers (as well as people having examination like me >.<). Here is an interesting article by Scott James Remnant on why your expensive card doesn’t play nice with Plymouth in Lucid. I also grow tired and wary of all the copy-n-paste instructions lying on the Internet which are out-dated and untested yet considered as panacea. My most hated one is ‘set gfxpayload=keep’ originated from Arch forum and now spreading like fire. It makes your the Virtual Terminal (VT) useless, ‘keep’ is not the working option in Ubuntu, last and not least, in Lucid, there is a more graceful way to do it. And I hope my guide below will not suffer the same fate as them. It was quite comprehensive after days of manual grinding and testing during exam period.


[Problems/Symptoms/Why-Are-You-Here]
Plymouth splash screen…

  • is in low res mode.
  • has corrupted graphic
  • is decent but can’t switch to virtual terminal or VT is horribly in low res mode
  • is decent but the splash screen only appears for a brief 1-2 second ( you are missing the dots moving :P), before that you only see a black/blank screen

[Environment]
Use Synaptic or ‘apt-cache policy ‘ or common-sense to find out.

  • GRUB >= 1.98-1ubuntu5
  • Plymouth >= 0.8.2-2
  • ATI cards with FGLRX >= 8.723.1-0ubuntu3
  • NVIDIA cards with nvidia-glx-1*
  • A clean without other tweaks to plymouth & grub, please revert them before proceeding. Really, it will not work if you insisted on apply other tweaks. !!! IMPORTANT !!!
  • Common-sense and google searching skill
  • A bit of risk taking spirit and confidence

[Caveats and Limitations]
I will use the uvesafb to fix all the problems mentioned above but I have to warn you about certain limitations first. They don’t affected me much though (widescreen works on mine). I think problem will come when you want to use solar theme or any complex theme as uvesafb doesn’t have acceleration -> slow. Extract from documentation for uvesafb

uvesafb is a _generic_ driver which supports a wide variety of video cards, but which is ultimately limited by the Video BIOS interface. The most important limitations are:
– Lack of any type of acceleration.
– A strict and limited set of supported video modes. Often the native or most optimal resolution/refresh rate for your setup will not work with uvesafb, simply because the Video BIOS doesn’t support the video mode you want to use. This can be especially painful with widescreen panels, where native video modes don’t have the 4:3 aspect ratio, which is what most BIOS-es are limited to.
– Adjusting the refresh rate is only possible with a VBE 3.0 compliant Video BIOS. Note that many nVidia Video BIOS-es claim to be VBE 3.0 compliant, while they simply ignore any refresh rate settings.

Also, uvesafb replaces vesafb in Ubuntu, in case you are wondering.


[Fix/Workaround]
* uvesafb required v86d package to be installed. Hwinfo package is required for the next step as well.
sudo apt-get install v86d hwinfo


* Find out the supported resolution by using hwinfo.
sudo hwinfo --framebuffer

Sample output :

02: None 00.0: 11001 VESA Framebuffer
[Created at bios.464]
...
Hardware Class: framebuffer
Model: "(C) 1988-2005, ATI Technologies Inc. M92"
Vendor: "(C) 1988-2005, ATI Technologies Inc. "
Device: "M92"
SubVendor: "ATI ATOMBIOS"
...
Mode 0x0321: 640x480 (+2560), 24 bits
Mode 0x0322: 800x600 (+3200), 24 bits
Mode 0x0323: 1024x768 (+4096), 24 bits
Mode 0x03ee: 1366x768 (+1408), 8 bits
Mode 0x03ef: 1366x768 (+2752), 16 bits
Mode 0x03f0: 1366x768 (+5504), 24 bits
Config Status: cfg=new, avail=yes, need=no, active=unknown


* Edit /etc/default/grub to make sure we boot with uvesafb framebuffer. For the mode_option parameter change to your native screen resolution you see from running the above comment (if not just set to 1024×768-24 which is safest. Oh, Netbook user – please exercise some common-sense here) Non relevant lines are omitted for clarity.

...
GRUB_CMDLINE_LINUX_DEFAULT="quiet splash nomodeset video=uvesafb:mode_option=1366x768-24,mtrr=3,scroll=ywrap"
...
GRUB_GFXMODE=1366x768


* Edit /etc/initramfs-tools/modules to include uvesafb by adding the following line.

uvesafb mode_option=1366x768-24 mtrr=3 scroll=ywrap


* Force the use of framebuffer:
echo FRAMEBUFFER=y | sudo tee /etc/initramfs-tools/conf.d/splash


* Update and we are done ๐Ÿ™‚

sudo update-grub2
sudo update-initramfs -u


* Now reboot and enjoy the high resolution sensation ๐Ÿ™‚ (my first reboot hangs, but 2nd time onward it works flawlessly). If it works correctly, you should be able to have moving dots with the splash screen; lesser time of blank screen and much more time with splash screen.

* And contrary to popular belief, my laptop resume and suspend works with uvesafb! ๐Ÿ™‚

* Thing you probably will see in dmesg if succeed:

[ 0.000000] Kernel command line: BOOT_IMAGE=/boot/vmlinuz-2.6.32-21-generic-pae root=UUID=44c7c661-1f5e-49e6-a14e-7a35f1ec3f9f ro quiet splash nomodeset video=uvesafb:mode_option=1366x768-24,mtrr=3,scroll=ywrap
[ 6.684235] uvesafb: (C) 1988-2005, ATI Technologies Inc. , M92, 01.00, OEM: ATI ATOMBIOS, VBE v3.0
[ 6.783693] uvesafb: protected mode interface info at c000:a2d4
[ 6.783695] uvesafb: pmi: set display start = c00ca376, set palette = c00ca434
[ 6.783727] uvesafb: VBIOS/hardware supports DDC2 transfers
[ 6.845060] uvesafb: monitor limits: vf = 61 Hz, hf = 48 kHz, clk = 69 MHz
[ 6.845110] uvesafb: scrolling: ywrap using protected mode interface, yres_virtual=1536
[ 6.847159] uvesafb: framebuffer at 0xc0000000, mapped to 0xf8380000, using 8256k, total 16384k
[ 6.854259] uvesafb: mode switch failed (eax=0x34f, err=0). Trying again with default timings.


[Other Alternatives]
* Rog131’s ‘Making a low resolution low color plymouth theme’ is an ingenious workaround. Here

* No splash screen but high resolution virutal terminal using EFI framebuffer. Edit /etc/default/grub, remove ‘splash’ option and replace the two entries below with your native resolution. Seriously, this is way better than setting the payload to keep and in 00_header. GRUB_GFXPAYLOAD_LINUX is only available from grub 1.98 in lucid.

...
GRUB_CMDLINE_LINUX_DEFAULT="quiet"
...
GRUB_GFXMODE=1366x768
GRUB_GFXPAYLOAD_LINUX=1366x768
...


[Last Words]
– Comments are welcome and appreciated.
– Testers are welcome.
– I will try to respond to you ASAP but spare me some thoughts cos the poor guy here is having his final exams at his university life ๐Ÿ™‚

If you are upgrading to Amarok 2.3 Clear Light and experiencing crashes, weird behaviour in layout, CD can’t be played. Then you can take few bold steps as I suggested below.

Note to self: once there is a major update, wipe clean the previous version completely.

Wipe out your config and application layout and database.


mv .kde/share/apps/amarok/ ~
mv .kde/share/config/amarok* ~

You lose all your playlist, cover arts, etc… but Amarok works amazingly well again. You can try putting the config/database back one by one. Though I don’t bet on that. Wipe config alone will not give you a functional Amarok you have to kill apps/amarok as well, like in my case, layout isn’t remembered and new scanned tracks got weird random tag from random existing track.

Cheers,

Hi,

Due to time constraint and burden from school work, I decided to forgo learning about making deb changes and upload to ppa. Apologize for it. This post will be a quick post on how to get firefox 3.6 without font rendering issues due to lcdfiltering and no –enable-system-cairo flag with official build.

Add the repository for firefox stable
deb-src http://ppa.launchpad.net/mozillateam/firefox-stable/ubuntu karmic main

Install the necessary dependencies and build tools. Also grab the wonderful patch from Marc Deslauriers (THANK YOU SIR!)


sudo apt-get update
sudo apt-get install build-essential fakeroot devscripts
mkdir ff-cairo
cd ff-cairo
sudo apt-get build-dep firefox
apt-get source firefox
wget http://launchpadlibrarian.net/38560863/firefox_3.6%2Bnobinonly-0ubuntu2%7Emd1.debdiff
cd firefox-3.6+nobinonly
patch -p1 < ../firefox_3.6+nobinonly-0ubuntu2~md1.debdiff
debuild -uc -us

Then grab a cup of coffee and wait till the build is complete. Then in your ff-cairo folder will have a list of *.deb. If you have already installed ff3.6 from the stable repo, then just double click firefox_3.6+nobinonly-0ubuntu5~mfs~karmic1_i386.deb and choose option to reinstall it. Then restart firefox and VOILA, your font smooth and crisp again ;P. If vanilla, then I am not sure (no time again)… but should be the branding package and the above package.

Will update this guide proper when I have some free-time =/

If you really trust me and want my compiled debs, drop me a message. And I will upload to mediafire or megaupload.

Cheers,

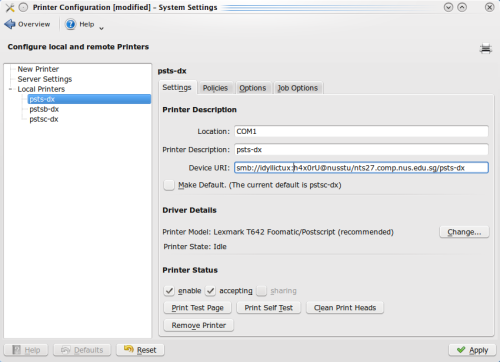
Unlike its brother (Ubuntu’s Printer Configuration), Kubuntu Printer Configuration itself is quite obscure in setting Authentication/Credential. There isn’t a dialog for you to change your authentication, also there is no verify button like its brother. In order to change our credential, we have to change the Device URI. Don’t worry, after you apply it, the username and password will be hidden from the URI.

Syntax for SMB Device URI:
smb://USERNAME:PASSWORD@DOMAIN/SERVER/PRINTER

Kubuntu Printer Configuration

Sample Kubuntu Printer Configuration

Also your username and password must conform to URL encoding standard meaning, if your password contain says space or @, you have to replace it with %20 and %40 accordingly (h4x0r@ will be h4x0r%40 when you type in the device URI). There is no automatic conversion for you ๐Ÿ˜ฆ . More on special characters on URL encoding http://www.blooberry.com/indexdot/html/topics/urlencoding.htm

Kubuntu works in a mysterious way.

Original relevant portion of ~/.kde/share/config/kioslaverc

[Proxy Settings]
AuthMode=0
NoProxyFor=192.168.1.254,localhost
Proxy Config Script=
ProxyType=0
ReversedException=true
ftpProxy=//:8080
httpProxy=http://proxy.singnet.com.sg:8080
httpsProxy=//:8080

And KPackagekit will complain about whenever you want to refresh repo cache or download packages whenever you change ISP. My home and university use different ISP. Anyway, //:8080 is definitely wrong for proxy address.

Modify this part as below and your KPackagekit will be good to go again.

[Proxy Settings]
AuthMode=0
NoProxyFor=192.168.1.254,localhost
Proxy Config Script=
ProxyType=0
ReversedException=false
ftpProxy=
httpProxy=
httpsProxy=

Howdy,

My trusted Toshiba Tecra M5 motherboard gave up on me last week. I ended up spending all my savings on a new HP ProBook 4310s from my university. But configure this baby is a pain when it comes to Linux.

I loaded Linux Mint 7 Gloria (GNOME) then switch to Kubuntu Jaunty with 4.3.1 from backport. After 1 week of tingling with the configuration, installation and uninstallation, finally I had a usable system. I will not elaborate too much at the moment, since I will have mid-term soon. Also I am going to nuke my current system when Karmic come out.

SOUND:

Add either of the line below in ‘ /etc/modprobe.d/alsa-base.conf ‘
options snd-hda-intel model=mobile
OR
options snd-hda-intel model=laptop

In KDE4 there isn’t much problem, but in GNOME, you might have to reload the alsa module from time to time, very annoying.
$ sudo alsa force-reload

Wireless:

iwl5100 needs backport module

$ sudo apt-get install linux-backports-modules-jaunty

ATI Mobility Radeon HD 4330:

This is the most painful thing when it comes to compositing.

You will probably need a no backfill patch. Some minors and tolerable corruption but no more slowness when maximized and resized.
https://launchpad.net/~ubuntu-x-swat/+archive/xserver-no-backfill

Stock fglrx-installer is the worst (install X crash when fullscreen in mplayer – both stock and from rvm ppa) . Fglrx 8.620 (CC 9.6) from x-updates is okay for generic use but XV in mplayer performance is terrible and also has scaling problems. Basically, your viewing experience in mplayer will be a horrible one. Best for me is CC 9.9 from AMD: good compositing, Xv correct scaling with default settings. http://www2.ati.com/drivers/linux/ati-driver-installer-9-9-x86.x86_64.run

Instruction for 9.9 can be found below. I used the 2nd link mainly for complete removal of the old conf.
http://wiki.cchtml.com/index.php/Ubuntu_Jaunty_Installation_Guide#Installing_the_drivers_manually
http://k3mist.com/linux/ati-catalyst-9-9-fglrx-8-650-installation/

Cheers,

Any problem please feel free to drop me a comment =)

UPDATE 1:
To install webcam viewer:
sudo apt-get install luvcview

UPDATE 2:
Upgrade to alsa 1.0.21 to have no more cracking noise with max PCM.
http://ubuntuforums.org/showthread.php?p=6589810

Here is a script to find the maximum MTU (the value before the packet is fragmented). I was not particularly satisfied with dlsreports guide. The command given for us linux might not work most of the time (doesn’t prohibit fragmentation at time) as well as it is not an automatic operation but relies on trial and error.

=================================================================================

#!/bin/bash

PKT_SIZE=1472
HOSTNAME="www.dslreports.com"

count=`ping -M do -c 1 -s $PKT_SIZE $HOSTNAME | grep -c "Frag needed"`

while [ $count -eq 1 ]; do
 ((PKT_SIZE--))
 count=$((`ping -M do -c 1 -s $PKT_SIZE $HOSTNAME | grep -c "Frag needed"`))
done

printf "Your Maximum MTU is [ $((PKT_SIZE + 28)) ] \n"

=============================================================================================

This script will neatly print out the maximum MTU at the end of the operation after finding the optimal value of the packet size.

Explaination:

-M do : Select Path MTU Discovery strategy do (proโ€hibitย  fragmentation,ย  even local one)

-c : to stop ping when you are done sending information.

-= My first offering to XFCE goddess =-

pyNeighborhood enables you to access your local network, mounting and unmounting shared folders, almost (yes, almost) 100% GUI – point and click. It works with both Windows and Linux shares,though I will cover the more problematic Windows share here. There are few guides floating around regarding pyNeighborhood but they falls short in tackle certain part as well as pose potential hazardous root access and alteration through file manager.

~* INSTALLATION *~

$ sudo apt-get install pyNeighborhood

~* CONFIGURATION *~

1. Set up the directory to be mounted

– If you prefer less troublesome procedure then just create one folder in your ‘/home/[username]’

– I prefer not to cluster my home, so I will set up the mount point in “/mnt/lan”

$ sudo mkdir /mnt/lan
$ sudo chown tux:tux /mnt/lan

You need to change ‘tux:tux’ to your username (owner) and group. Say your username is ‘foo’ then the syntax will be ‘foo:foo’.

2. pyNeighborhood can be accessed through “Applications” -> “Network” -> “pyNeighborhood”

3. Now, select “Edit” -> “Preferences” in pyNeighborhood.

– ‘General’ tab:ย  ‘Mount folder’ will be the path to the folder we set up in step 1.

– ‘Network’ tab: Tick ‘Always use msbrowse’ if unchecked as well as ‘Try to retreive IP address when adding a machine from the group browser’.

– ‘SMB’ and’CIFS’ tab: append this chunk in front of each command. Say my username is ‘tux’ again, for example SMB tab mount command will now be:

‘sudo -u tux smbmount’

Repeat the same for the rest of the mount and unmount command but replace your username instead of tux.

This step is IMPORTANT because it let you mount without entering root password and your filemanager will not having root access thus avoid the potential hazardous alternation. Everything will be inside your userspace only. The -u (user) option causes sudo to run the specified command as a user other than root.

– ‘File Managers’ tab, remove the xterm one and a new entry: ‘thunar’ (or whatever filemanager you are using).

~* USING pyNeighborhood *~

From the left panel, you will see an icon with a name of ‘Groups’. Select it then Right click and select ‘Scan using msbrowse’

Your local workgroup will appear in the left panel under ‘Groups’, so right click on it and click ‘scan’ to show the machines under that workgroup. [Error might occur here, go to troubleshooting part later in the guide]

Choose a machine to browse, right click on it, and click ‘Add’. Alternatively, you can also double click. Try to retrieve the machine’s IP address if it is not already entered, and then click ‘Ok’.

The machine will appear in the right hand pane. Right click on the machine and click ‘scan’ to show the machine’s shared folders.

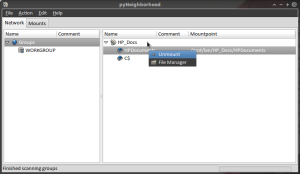
To mount a share, right click on it and click ‘mount -> mount as SMB’ (note: if SMB does not work the share will automatically be mounted through CIFS). Alternatively, you can also double click. You will see the ‘Mountpoint’ beside change to the path of your mount folder.

Right click the share, ‘unmount’ to unmount or ‘File Manager’ to access the file.

Have fun! ๐Ÿ™‚

~* Troubleshooting *~

Thing will get a bit frustrating when you see this error on the status bar when you try to scan for machine under workgroup: ‘Failed to scan workgroup WORKGROUP’. Here we have to use commandline to get detail for the machine on the network then add to pyNeighborhood.

Open your terminal, type in the following command, note the workgroup and machine.

$ smbtree -S
WORKGROUP
\\HP040

So there is a machine HP040 in workgroup WORKGROUP. Now we will have to look for the IP of the machine we want using the following command. Just replace HP040 with whatever the smbtree spit out or the machine you want to connect to.

$ nmblookup -I \HP040
querying HP040 on 192.168.1.255
192.168.1.64 HP040<00>

The IP of HP040 is 192.168.1.64, so note that down.

Go back to our pyNeighborhood, ‘Edit’ – ‘Add Machine’

‘Network Name’ : Name of the workgroup spit out by smbtree

‘IP address’ : the ip above

‘Display in a list as’ : whatever you fancy of.

That’s it. We’re done. You can mount and view the machine from the right panel. ๐Ÿ™‚

A picture speaks a thousand words:
pyNeighborhood